Saturday, March 31, 2012

Heartland Gourmet Review: Lemon Cupcakes and Garlic Cheddar Bread


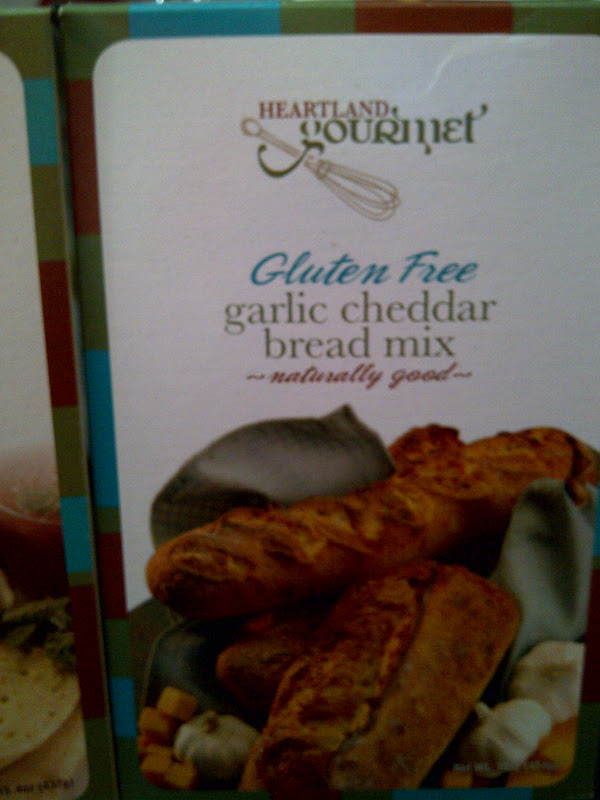
     After quite a time connecting I finally received my review box from Heartland Gourmet. Heartland has a glutenfull line and also a gluten free line of foods. I of course got items from their gluten free line. Inside my box was: Garlic Cheddar Bread Mix, Lemon Cupcake Mix, Carrot Cake Mix, Red Velvet Cupcake Mix, Gluten Free Pizza Crust Mix, and Gluten Free Cornbread Mix.
     Heartland sells their Mixes on their website. Their price point is $6.99. I have also run across their mixes at Cost Plus World Market, and I think they actually sell the mixes for less than the company does. So if you have a World Market.....check there first for a better price.
     I decided to choose two of the mixes for you today for my review. I picked the Lemon Cupcakes and the Garlic Cheddar Bread. I thought that they both sounded pretty amazing. I'm a huge fan of anything lemon and anything cheesy/garlic (but not lemon, cheese, garlic together ha ).
     I liked that the ingredients needed for their mixes were things that you would have on hand. Eggs, water, oil....nothing too wild. I hate when I have to run to the store just to make a mix. SO kudos to Heartland for knowing that a mix should be easy.
     I started by making the Lemon Cupcakes first. I opened the package of mix and could smell the lemon flavor in the mix. It smelled genuine, not like a lemon cleaning product (points for that). I quickly mixed everything together and got them into the oven. Easy Peasy. I will confess that I did not use their frosting recipe on the back of the box. It sounded lovely, but I didn't have all of the ingredients for it, but I did have a nice can of cream cheese frosting to complete the easy peasyness of the box mix. It worked out great. I would definitely buy this mix again. I thought it had a great lemon flavor, not too overpowering though. Very yummy.
     I next mixed up the Garlic Cheddar Bread. It was also fairly easy to make. However, at one point the instructions say to "kneed" the dough and my dough was WAY too sticky for kneading with my hands (even used the lowest amount of water recommended). SO I skipped that step and kept on using my spoon. I covered the dough with a towel and let it rise for 45 min. I honestly couldn't really tell that it had risen much in that 45 minute time period. After the 45 min. I punched the dough back down and I formed mine into bread sticks. I thought they would be yummy dipped in some pizza sauce. I'm not sure I would actually eat a loaf of bread flavored with garlic and cheese. Maybe I'm weird?!?! (no comments ha ). I let my bread sticks raise for another 45 minutes per the package instructions. I could actually tell they had risen this time. I then baked them and while they were warm I dipped a couple into some yummy pizza sauce. It was quite good. I would make these again as a side dish for some pasta. YUM!
     I'm anxious to try some of the other mixes that they sent out to me. However, a girl can only cook so many things in one day!! Keep your eye out for these mixes and give them a try. I liked them.

-Jessica


Rock Chalk Tots.....pure game food!!


     My favorite team is still in the Final Four. In fact....the game is getting ready to start. I'm going to quickly crank out this blog post so I can go and cheer on my team!! I hope you enjoy this "game food". What's not to love? It has bacon, cheese, tots, caramelized onions......*insert a Homer Simpson drooling noise*


Rock Chalk Tots

1/2 Bag of Tater Tots, baked until golden and crispy
1 Large onion, sliced and cooked until caramelized
6 -8 Strips of Bacon, Cooked and crumbled
1/2-1 C Shredded Cheese
1 small bunch of green onions, diced

Top your cooked tater tots with the caramelized onions. Spread the onions out evenly over the tots. The next layer is the crumbled bacon pieces. Top that with cheese. Bake for 15 minutes in a 375 deg. oven. Remove from the oven and top with the diced green onions. Serve with your favorite dippers (sour cream, ketchup, barbecue sauce)

I started out by caramelizing my onion. I had a HUGE onion (over 1 lb). I used about 5 T. Margarine and put it all into a heavy skillet on medium heat.

Occasionally stir the onion and eventually it gets this deep caramel coloring YUM!! It does take a while, so be patient.
After everything is cooked, you just start layering. Tots then caramelized onions, bacon is next...
Cheese is the last item, then into the oven for 15 min. to melt the cheese and warm everything up.
When it comes out of the oven, top with the green onions and serve hot!


Enjoy this at your next big game party!!!

-Jessica

Wednesday, March 28, 2012

Sweet and Sour Meatloaf Meatballs in the Slow Cooker


     I'm going through a food rut.....nothing sounds good. I hate putting effort into meals when nothing sounds good. So I decided that I would adapt a recipe that I love into a crock pot recipe. I didn't want to try anything new while my taste buds were so blah!! I knew that I already loved these flavors and I thought I just may love them more if there was less effort involved! ha

Sweet and Sour Meatloaf Meatballs in the Slow Cooker

1 lb Ground Turkey
1/2 c. Minute Rice
1/3 c. Milk
1/2 tsp. Garlic Powder
1/2 tsp. Black Pepper
1 T. Parsley
1 Egg
1/2 C. Diced Onion

Sauce:
1 8oz. Can of Tomato Sauce
1/2 C.  and 2 T. Brown Sugar
2 T. Vinegar
2 tsp. Mustard

Combine the ingredients together to make the meatballs. Don't over mix.

Form the meatballs and place into a slow cooker sprayed with cooking spray. Continue until you have used all of the meat mixture.

Combine all of the ingredients for the sauce. Whisk until combined. Pour over the meatballs.

Cook on low heat in the slow cooker for 3-4 hours.

Combine all of the meatball ingredients.

Mix until combined, but don't over mix (you don't want to overwork the meat)
I have an ice cream scooper that is my meatball scoop. It is ONLY used for that. It makes making meatballs SO much easier and less messy!!
Spray the inside of the slow cooker with cooking spray and line the bottom with meatballs.

Mix the ingredients for the sauce.

Pour the sauce over the meatballs. Cook on low heat for 3-4 hours.
Mine ended up staying on "warm" for several more hours until I got home to eat....they still looked and tasted good!


I hope you like this yummy crock pot recipe. Enjoy!!

-Jessica

Saturday, March 24, 2012

People Puppy Chow.....more chocolate peanut butter love!


     Growing up this is probably one of the first recipes that I made "all by myself". I remember making this in 4-H at a cooking meeting. I remember being proud because I made it "all by myself". Where I am from it is called People Puppy Chow, I guess because it sort of looks like dog food?? Or because we snarf it down like dogs? However it tastes nothing like dog food (I'm guessing here because I've never eaten dog food). I have also heard it called muddy buddies and chocolate peanut butter snack mix (oh original creative name there).
     You may think I am crazy once you see that I mix mine up in a big paper sack, but you will thank me once it's time to do the dishes!! This stuff it yummy, but kind of messy to make. It's SO worth it though!! If you are a peanut butteraholic like me...you will appreciate this recipe. Let's get to work!

People Puppy Chow

1 C. Peanut Butter
1 Bag Milk Chocolate Chips (11.5-12 oz)
1/2 C. Margarine (1 stick)
1 Box Rice Chex
3 C. Powdered Sugar


In a microwave safe dish, melt the peanut butter, chocolate, and margarine. Cook for 30 sec. intervals stirring each time until melted and creamy. Pour the mixture over the cereal. Toss to coat.

In a large paper sack combine the coated cereal and powdered sugar. Roll the bag down tight and shake to coat. Allow to cool and dry. Store in a airtight container.

Combine chocolate chips, peanut butter, and margarine in a microwave safe dish. Melt until creamy and smooth.
Pour the creamy chocolate mixture over the cereal. Toss to coat.
Use a clean brown grocery bag for the next step.
Pour the chocolate/cereal and the powdered sugar into the brown paper bag.
Roll the paper bag down tight and shake shake shake to coat. (I do this over the kitchen sink because sometimes powdered sugar finds it's way out of the bag)


Allow the mixture to cool and dry before storing.

 I hope you all enjoy the People Puppy Chow recipe. I also hope that it all sells tomorrow at our Relay for Life Fundraiser!!! (less that I will be eating if it sells) Enjoy!

-Jessica

Tuesday, March 20, 2012

Dirt Dessert.......Happy Spring!


     Today is the first day of Spring!!! Spring is my favorite season. The temperatures are mild and the flowers are blooming. I LOVE it! I decided that I would make a gluten free version of Dirt Dessert to commemorate the first day of Spring!

Disclaimer: No gummy worms were harmed in the making of this blog.

Dirt Dessert - the gluten free way

1 package cream cheese (8oz), Softened
1 C. Powdered Sugar
3 1/2 C. Cold Milk
2 Packages(3.4 oz) Pudding Mix (use vanilla, chocolate, or white chocolate for best results)
1 Carton (16 oz) Whipped Topping, thawed
1 package gluten free cream filled sandwich cookies, crushed (Glutino and Kinnikinnick both make gf)
1 package gummy worms (check labels to be sure they are gf)

In a large bowl beat the cream cheese and powdered sugar until smooth, set aside. In a second large bowl combine the pudding mix and cold milk. Whisk until mixed completely. Let stand for about 2 minutes or until it is soft-set. Gradually stir the pudding mixture into the cream cheese mixture. Mix until creamy and completely combined. Mix 1/2 C. of the crushed cookies into the mixture.  Fold the whipped topping into the pudding/cream cheese/cookie mixture.

Spread approximately 1/2 C. crushed cookies on the bottom of a 9x13 in. pan. Spread the pudding mixture on top of the cookies. Top with the remaining crushed cookies. Lay gummy worms on top of the "dirt" or poke them down into the "dirt".  Refrigerate for at least 1 hour before serving.

To crush the cookies, I put them into a gallon plastic baggie and banged on them with my meat mallet :) You could also put them into a food processor
Mix the cream cheese mixture and the pudding mixture together.
Fold in the whipped topping.
Dirt dessert can also be made into individual serving cups.

I decorated with some live cut flowers to make my cups more "adult". I just took my live flowers, wrapped about an 1 1/2 in. of the bottom of the stem in plastic wrap and stuck it down into the dirt.


Happy Spring!!!!

I hope you enjoy this fun recipe.

-Jessica